
 By cooperation@iumrs.com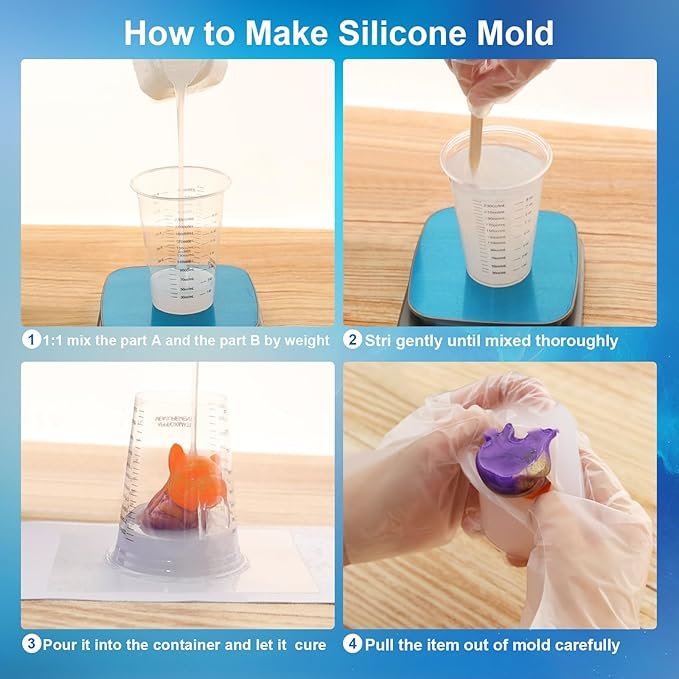
Imagine this: You have a perfect vintage button. You want to cast dozens of replicas in resin to use as earrings. But you cannot find a mold that fits that specific size.
Or perhaps you have a one-of-a-kind seashell from a memorable beach vacation. You want to preserve it by making a soap mold, but commercial molds are all generic rectangles.
Or maybe you are a baker who needs a custom chocolate mold shaped like your family crest for a wedding cake.
What do you do?
You stop searching. You stop compromising. You make your own mold.
Welcome to the world of liquid silicone mold making. And welcome to the kit that makes it accessible, affordable, and almost magical: the IUMRS 64oz Super Elastic Liquid Silicone for Mold Maker.
This is not just a product. It is a key that unlocks unlimited creativity. With 64 ounces of premium, food-grade, fast-curing silicone, you can duplicate anything—from a delicate flower to a rugged stone—with microscopic precision. No vacuum degassing chamber required. No expensive equipment. No engineering degree.
Let’s dive into why this kit is about to become the most versatile tool in your workshop or kitchen.

Part One: The Problem with Buying Molds Off the Shelf
We have all been there. You walk into a craft store or scroll through an online marketplace looking for a specific mold. You need a rectangular mold that is exactly 5 inches long, 3 inches wide, and 1.5 inches deep for your concrete coasters. You find one that is 4×2. Or 6×4. Never exactly what you need.
And the shapes? Forget it. You want an octagonal candle mold. You want a mold of your child’s handprint. You want a mold that fits that weird antique knob you want to reproduce. The mass market does not cater to your unique vision.
Commercial molds also have quality issues. They are often made of cheap, thin silicone that tears, loses its shape, or sticks to your casting material. You pay $20 for a single mold that lasts three uses.
The alternative? Make your own. And with the IUMRS kit, making your own is easier than baking a boxed cake mix.
Part Two: What You Get – The Complete 64oz Kit
Let’s open the box. The IUMRS Silicone Mold Making Kit is designed for beginners and pros alike. No hidden surprises. No need to run out and buy extra tools (well, maybe a mixing cup—but we will get to that).
The Kit Includes:
- Two 32oz bottles of liquid silicone (Total 64oz / 1.9 liters) – Part A and Part B, platinum cure.
- 5 wooden mixing sticks – for thorough, bubble-minimizing stirring.
- 6 disposable protective gloves – because safety first (silicone is skin-safe, but gloves keep your hands clean).
That is it. You provide your master model (the object you want to copy), a container to hold the mold (a cardboard box or plastic cup works), and a mixing cup. The silicone provides everything else.
64 ounces is a substantial amount. To give you perspective:
- You can make a mold of a large apple or orange.
- You can create a 6″ x 6″ x 2″ block mold for casting multiple small items.
- You can make several smaller molds (candle, soap, chocolate) from one kit.
- You can make a brush-on mold for a larger statue (using multiple layers).
For most hobbyists, this kit will last for months of projects.
Part Three: The Magic of Platinum Cure – Food Grade & Detail Perfect
Not all liquid silicones are created equal. There are two main types: tin-cure and platinum-cure. Tin-cure is cheaper, but it shrinks over time, releases harmful byproducts, and is not safe for food contact.
IUMRS uses platinum-cure silicone. This is the premium standard.
Why platinum-cure matters to you:
- Food Safe: Once fully cured, this silicone is food-grade. You can make molds for chocolate, candy, cake fondant, ice cubes, and gelatin desserts. No toxic leachates. No strange smells. This is the same material used by professional pastry chefs.
- No Shrinkage: Platinum-cure silicone maintains its dimensions. If your master object is 2 inches wide, the mold cavity will be exactly 2 inches wide. This precision is critical for resin casting where every millimeter counts.
- Long Shelf Life: The kit promises over 1 year of shelf life. Tin-cure silicones often degrade in 3-6 months. With IUMRS , you can buy a kit, use half, and come back to the rest a year later. It will still work perfectly.
- Detail Reproduction – Hardness 10A: The silicone cures to a Shore hardness of 10A. This is very soft and elastic. Why is soft good? Because it allows you to demold complex shapes without cutting the mold. We will dive deeper into that later.
The combination of low hardness and platinum chemistry means you can capture the texture of a leaf’s veins, the ridges of a seashell, or the engraving on a coin. The silicone flows into every microscopic crevice before curing, creating a perfect negative replica.
Part Four: No Vacuum Degassing Required – A Beginner’s Dream
Let’s address the biggest fear for first-time mold makers: bubbles.
When you mix two viscous liquids, you trap air. If that air turns into bubbles in your silicone, those bubbles become bumps on your mold. Those bumps then transfer to every casting you make. It is a nightmare.
Traditional mold making requires a vacuum degassing chamber—a $200+ piece of equipment that sucks the air out of the silicone before you pour it. For a hobbyist, that is a dealbreaker.
IUMRS has engineered their silicone to eliminate this need.
Here is the science: This silicone has a low viscosity of 1500 cP (centipoise). For comparison, honey is about 10,000 cP. Water is 1 cP. At 1500 cP, this silicone flows like warm maple syrup. It is thin enough that air bubbles can rise to the surface on their own.
The claim: “No vacuum degassing is necessary! The bubbles of silicone for mold making will automatically disappear within 1.5 hours at room temperature.”
This is revolutionary. You mix the two parts, pour them over your master object, and then simply wait. Over 90 minutes, the bubbles migrate upward and pop. No special equipment. No complex procedures. Just patience.
Pro Tip: To further reduce bubbles, pour the silicone from a height in a thin stream. Use the wooden mixing sticks to stir slowly (do not whip like scrambled eggs). Tap the container gently on the table to encourage bubbles to rise.
For 99% of home projects, this bubble-clearing ability is all you need. Professionals may still use a vacuum chamber for perfection, but beginners will be thrilled with the results straight out of the box.
Part Five: Easy 1:1 Mix Ratio – No Scales Required
One of the most intimidating parts of two-part materials is the mixing ratio. Some silicones require 100:3 ratios by weight, forcing you to buy a precision scale and do math.
IUMRS keeps it simple: 1:1 by weight OR volume.
That means you can use a measuring cup. Pour 4 ounces of Part A and 4 ounces of Part B into a mixing cup. Done. No scale. No fractions. No confusion.
Step-by-Step Mixing:
- Prepare your master object. Place it in a container (a plastic cup, a cardboard box lined with tape). Ensure it is clean and dry. If your object is porous (wood, plaster, unglazed clay), seal it with a thin layer of clear acrylic spray or release agent to prevent the silicone from soaking in.
- Measure equal parts. Use disposable measuring cups. Pour Part A and Part B separately. The kit includes gloves – wear them.
- Mix thoroughly. Use the provided wooden mixing sticks. Stir slowly but consistently for 2-3 minutes. Scrape the sides and bottom. You want a uniform color (the two parts are often slightly different; a consistent color means fully mixed).
- Pour. Pour the mixed silicone in a thin stream into the lowest corner of your container. Let it flow over your master object. This minimizes trapped air.
- Wait. At 22°C (71.6°F), the silicone will cure in 2-4 hours. The working time (pot life) is about 40 minutes, so you have plenty of time to pour carefully.
- Demold. Once cured, peel the silicone away from your master object. Congratulations. You have made a perfect, reusable mold.
Note on Curing Time: Silicone cures faster in warm temperatures, slower in cold. If your workshop is 15°C (59°F), expect longer curing times (maybe 6-8 hours). Do not rush. Do not apply artificial heat (a hair dryer can cause bubbles). Let nature take its course.
Part Six: Super Elastic & 10A Hardness – Demold Without Cutting
Here is a feature that will save you hours of frustration: softness.
Many mold-making silicones cure to a hardness of 20A, 30A, or even 40A. These are stiff rubbers. They hold their shape well, but they are difficult to peel away from complex objects. If your master has undercuts (like a doorknob or a figurine with arms sticking out), a hard silicone mold will lock the object inside. You have to cut the mold open with scissors, destroying it in the process.
IUMRS silicone cures to 10A Shore hardness. This is significantly softer – think of a gummy candy or a soft silicone spatula.
What does 10A mean for you?
- You can demold without cutting. For 3D objects, you can simply flex and stretch the silicone to release the master. The mold returns to its original shape.
- It is gentle on fragile masters. If your master is made of clay, wax, or plaster, a stiff silicone might tear it during demolding. Soft silicone releases with minimal force.
- It captures undercuts. You can mold objects with lips, grooves, and protrusions because the silicone stretches around them.
Of course, there is a trade-off. Very soft silicone molds may need external support (like a rigid mother mold or a cardboard box) when casting heavy materials like concrete. But for resins, wax, soap, and chocolate, the 10A hardness is perfect. It strikes the ideal balance between elasticity and stability.
Part Seven: Wide Application – From Resin Art to Ice Cubes
The versatility of this silicone is staggering. Because it is food-grade and detail-friendly, you can use it for virtually any casting material.
Casting Materials That Work Perfectly:
| Material | Best Use Case |
|---|---|
| Epoxy Resin | Jewelry, coasters, small sculptures, paperweights. |
| Polyester Resin | Larger art pieces, automotive parts (use ventilation). |
| Wax | Candles, wax seals, batik stamps. |
| Plaster of Paris / Gypsum | Garden ornaments, architectural details, kid’s crafts. |
| Concrete / Cement | Planters, garden stepping stones, industrial decor. |
| Soap (Melt-and-Pour or Cold Process) | Custom-shaped soap bars for gifts or sale. |
| Candle Wax (Soy, Paraffin, Beeswax) | Taper candles, container candles, wax melts. |
| Chocolate & Candy | Custom chocolates, lollipops, gummy candies. |
| Ice Cubes | Giant ice spheres for whiskey, fruit-infused ice cubes. |
| Cake Fondant & Gum Paste | Decorative cake toppers, sugar flowers. |
Example Projects:
- Resin Artist: Make a mold of a vintage key, then cast dozens in gold resin to sell as zipper pulls.
- Candle Maker: Create a mold of a pinecone, then cast wax candles that look like pinecones.
- Soap Maker: Embed a small rubber duck in silicone to make a “duck-shaped cavity” soap mold.
- Baker: Press a real strawberry into clay to make a master, then make a silicone mold to cast strawberry-shaped chocolates.
- Home DIYer: Make a mold of a broken decorative finial, then cast a replacement in resin.
The only limit is your imagination – and your supply of silicone.
Part Eight: Step-by-Step – Your First Mold in Under 4 Hours
Let’s walk through a concrete example. You want to make a mold of a small seashell to cast resin earrings.
What you need:
- IUMRS 64oz Silicone Kit
- A small plastic cup (the mold container)
- A seashell (the master)
- Hot glue or clay (to secure the shell)
- Mixing cup and wooden stick (provided)
- Gloves (provided)
Step 1: Secure the master.
Glue the seashell to the bottom of the plastic cup, facing up. You want the open side of the shell up so the silicone flows into it.
Step 2: Mix the silicone.
Put on gloves. Measure 3 ounces of Part A and 3 ounces of Part B into a mixing cup. Stir slowly for 2 minutes until uniform.
Step 3: Pour.
Hold the cup high. Pour the silicone in a thin stream into the container, aiming for the side wall rather than directly onto the shell. Let the silicone slowly cover the shell. Pour until the shell is submerged by at least 1/2 inch.
Step 4: Wait.
Set the container on a level surface. Walk away for 3-4 hours at room temperature (22°C / 72°F). You will see bubbles rising and popping during the first hour.
Step 5: Demold.
After 4 hours, check if the silicone is fully cured (it should feel like a gummy eraser, not tacky). Peel the container away (or cut it if plastic). Then carefully stretch the silicone away from the seashell. The shell will pop out cleanly.
Step 6: Cast.
Mix resin, pour into the seashell cavity, cure, demold. You now have a perfect resin replica of the original shell.
Total time: Under 5 hours from start to finished resin copy.
Part Nine: Storage & Shelf Life – A Long-Term Investment
One concern with liquid silicone is that once you open the bottles, the clock starts ticking. Moisture and air can degrade the catalyst.
IUMRS promises a shelf life of over 1 year. To achieve this:
- Store the bottles tightly sealed in a cool, dry place away from direct sunlight.
- Avoid extreme temperatures (don’t leave in a hot car or freezing garage).
- Do not contaminate the bottles with foreign materials (use clean measuring cups).
Many users report that the silicone still works perfectly even after 18 months if stored properly. This means you can buy the 64oz kit, use half for a big project, and save the rest for smaller projects over the next year.
Part Ten: After-Sale Service – A 3-Month Safety Net
Craft supplies are an investment. What if you mix it wrong? What if you don’t like the consistency? What if the product arrives damaged?
IUMRS offers a 3-month return/exchange window. That is 90 days to test the product, make a few molds, and decide if it meets your needs.
If you are unsatisfied for any reason – even if you simply change your mind – you can return it within 3 months. Additionally, their customer service team is available 24/7 online to answer technical questions, troubleshoot curing issues, or guide you through your first mold.
This level of after-sale protection is rare in the mold-making industry. It shows confidence in the product and respect for the customer.
Part Eleven: Comparison – IUMRS vs. The Competition
| Feature | IUMRS 64oz | Typical Cheap Silicone | Professional Brand (e.g., Smooth-On) |
|---|---|---|---|
| Price per ounce | Low (excellent value) | Very low (but poor quality) | High (up to 2-3x) |
| Food Grade | Yes (platinum) | Usually no (tin) | Often yes, but expensive |
| Vacuum Degassing Needed | No (bubbles self-disperse) | Yes (or poor results) | Usually yes |
| Hardness | 10A (super soft, easy demold) | Varies, often too hard (20-30A) | Varies (soft options cost more) |
| Mix Ratio | 1:1 (easy) | Often 100:3 or 100:10 (complex) | Usually 1:1 or 10:1 |
| Shelf Life | 1+ year | 6 months | 1 year |
| Return Policy | 3 months (generous) | 30 days or none | Usually 30 days |
For the beginner or intermediate maker, IUMRS offers the best balance of quality, ease of use, and value. You do not need to spend 200�������������������200onvacuumequipmentor100 on a tiny bottle of premium silicone. This kit democratizes mold making.
Part Twelve: Troubleshooting – What If Something Goes Wrong?
Even with a great product, things can happen. Here is a quick guide.
Problem: Silicone did not cure (still sticky).
- Likely cause: Wrong mix ratio. Did you measure equal parts by volume? Or did you forget to mix thoroughly?
- Solution: Let it sit longer (low temperatures slow curing). If still tacky after 24 hours, it will not cure. Scrape it off and start over.
Problem: Bubbles in the cured silicone.
- Likely cause: Poured too fast or stirred too vigorously. Or your master had deep crevices that trapped air.
- Solution: For deep crevices, brush a thin layer of silicone onto the master first (this is called “detail coating”). Let it tack up, then pour the rest. Also pour from a height.
Problem: Silicone stuck to the master.
- Likely cause: Master was porous (wood, unsealed plaster) and the silicone penetrated.
- Solution: Always seal porous masters with acrylic spray, clear varnish, or a thin layer of release agent.
Problem: Mold tore during demolding.
- Likely cause: The master had sharp undercuts, and you pulled too hard. Or the mold was too thin.
- Solution: Make the mold thicker (at least 1/2 inch walls). For extreme undercuts, use a multi-part mold technique (beyond the scope of this article, but plenty of YouTube tutorials exist).
Part Thirteen: The Verdict – Unleash Your Inner Mold Maker
The IUMRS 64oz Super Elastic Liquid Silicone Mold Making Kit is more than a product. It is a gateway.
It allows you to look at any object – a pretty pebble, a vintage button, a carved apple, a child’s toy – and think, “I can duplicate that.”
It frees you from the tyranny of mass-produced molds that never fit your vision.
It saves you money in the long run because 64 ounces of silicone can produce dozens of custom molds, whereas buying individual commercial molds would cost hundreds of dollars.
Who is this kit for?
- Resin artists who want unique shapes not available in stores.
- Candle & soap makers who want to stand out with custom designs.
- Bakers and chocolatiers who want to create signature desserts.
- DIY home improvers who need replacement parts or decorative accents.
- Small business owners who want to produce their own product line.
- Beginners who have always been curious about mold making but intimidated by vacuum chambers and complex ratios.
The bottom line: This kit works. It is forgiving. It delivers professional results without professional equipment.
So go ahead. Find that interesting object on your shelf. Mix up a batch of silicone. Wait a few hours. And then experience the thrill of peeling away a perfect, custom-made mold that you created with your own hands.
Click below to order the IUMRS 64oz Silicone Mold Making Kit today. Your next great creation is just a pour away.